

How To Recolor Something In Photoshop
Existence a color fiend, in that location's many times where I take a color scheme in my head, but not all my objects exactly friction match in my photograph.
Bringing harmony to your photo with colors is a nifty way to create a powerful image. Even having your hues slightly beveled tin can make your epitome experience off.So what does one do with all this amazing technology at our hands? Recolor objects in Photoshop, of grade ;)There'due south many ways to go about this, but a i-size-fits-all approach doesn't always work. Depending on your original prototype, yous may accept to endeavor combining a couple approaches to brand information technology look natural.
Read on for my five simple ways to recolor objects in Photoshop!

1. Hue & Saturation
The first tried-and-true style to recolor your objects is to apply the hue and saturation layer. To do this, simply go to your adjustments panel and add a Hue/Saturation layer. Toggle the box that says "Colorize" and start adjusting the hue to the specific colour you want. If your object is a lighter shade, you may need to accommodate the lightness past making your selection darker to go the richness of colour yous desire. The aforementioned goes for the reverse: if you have a darker object you demand to colorize, pump in some low-cal to those darker areas by increasing your lightness.Lastly, play around with the saturation to become the desired upshot you lot want. Typically, the lighter the object, the more than I demand to saturate my color. If my object is darker, then a higher saturation looks unrealistic. Run into what works best for the object you're coloring. Once yous're satisfied with the colour, use your brush on the layer mask to paint the areas where y'all don't want the color change to happen.
Pros:
The reason why I dear this approach is because it'due south not-destructive and hands changeable.
Cons:
You need to be careful when it comes to changing rich, saturated colors, peculiarly red. You lot may get some strange outlines/color banding in your shadow areas, and then just be mindful of that.

ii. Color layer
This is a bully alternative to the Hue/Saturation layer.Go to Layer > New Make full Layer > Solid Color... and click OK on the menu that pops upwardly. This volition bring up the Color Picker menu.Choose what color y'all'd like to brand your object. This decision doesn't take to exist final, considering you can easily change information technology after :) What's prissy almost creating a Color Fill is that it automatically creates a mask for that layer. Click on that mask and outset to pigment the areas you don't desire to be afflicted. Once everything looks good, ready your layer blend mode to Color and you're finished! Sometimes duplicating the layer besides helps achieve the rich color yous're looking for.
Pros:
Information technology's a fabulous manner to go some colors that may be hard to achieve in Hue/Saturation due to the shadow banding.
Cons:
This method doesn't work well with all colors and the upshot tin be somewhat unpredictable at times, depending on the color you lot choose and the color of your object.
three. Selective color with Hue/Saturation

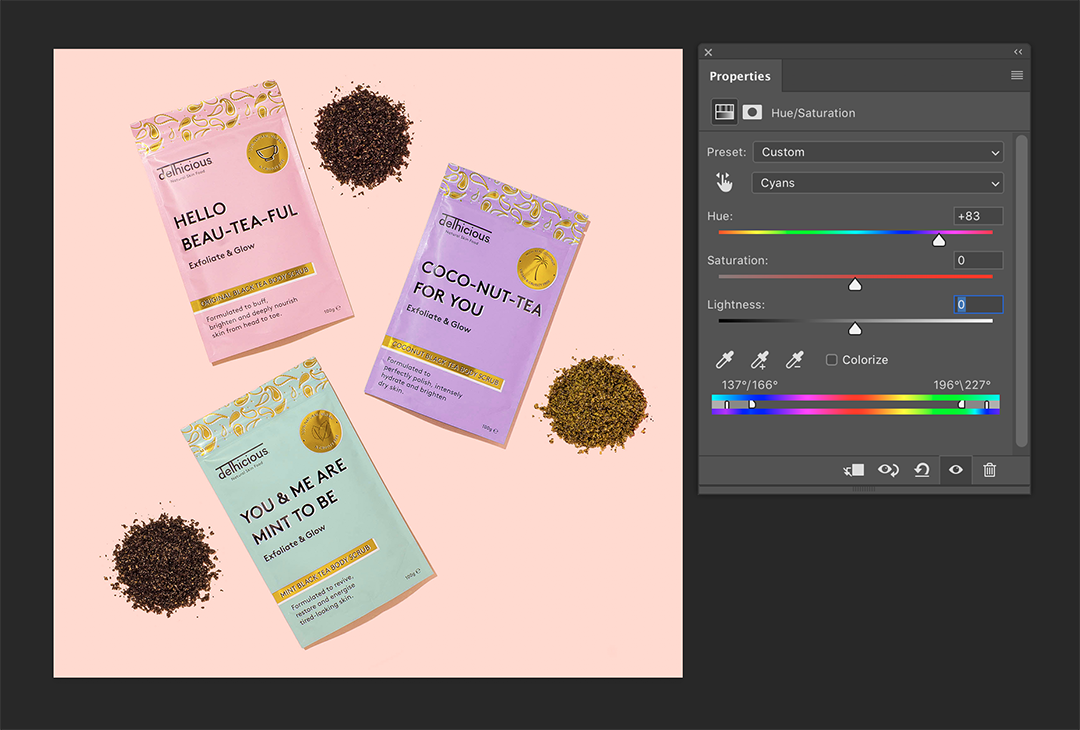
This is a bang-up option if you lot want to target a specific colour in an intricate image.In your layers console, create a new Hue/Saturation adjustment layer. Instead of colorizing the layer as nosotros did before, we're going to go to the dropdown card that currently says "Principal" and select the specific color we'd like to target.In this image, I want to change the blue package to purple—just painting around all those intricate design elements on the bag would be pretty time consuming.In my Hue/Saturation panel, I'm going to drop down to the Cyans, and so the merely colors I'grand changing are those within that cyan range. Determine what color y'all desire to change and select the option that best fits it.Bring your saturation all the way to -100 so you tin can clearly come across what colors are beingness affected. Yous may need to play around with the color bar at the bottom to refine the color option. Merely drag it so the eye part of the bar is over the color you lot'd like to change.Once the color you want to change in your image is completely gray, bring your saturation back up to 0. Anddd here's the fun part: starting time adjusting your Hue slider until it'due south the verbal colour you want—and that'southward it!
Pros:
This is a great option for more intricate color selections you lot don't want to manually mask.
Cons:
This method won't piece of work well if you accept lots of similar colors within an image, as it will affect them all.
iv. Using the brush tool & Hue blending manner
Load your castor with the color you'd like. Set your brush Menstruation to 30% and on a new layer, start brushing in the areas where you lot want the colour. If you painted where you didn't want colour, that'due south fine. You lot tin can either erase it, or what I prefer to exercise, is create a mask then that it'due south non-subversive and I tin can hands get dorsum. To practise this, merely click the button at the bottom of your layers panel that has a circle inside a rectangle. Once everything looks the way you desire information technology, alter your layer's blending way to Hue and voila!
Pros:
It's super easy and quick to go an authentic color you lot desire.
Cons:
This method isn't the best for more intricate details in your image.
5. Curves
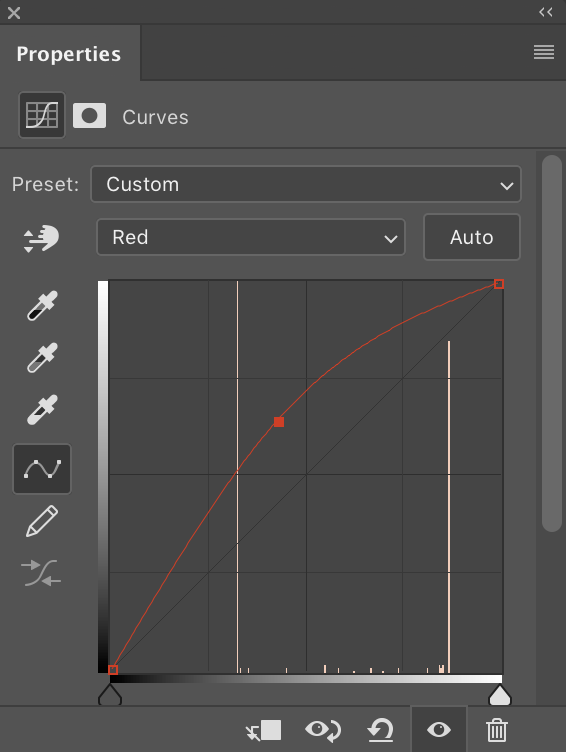
This is a super quick way to add tints of colors to your objects. In your layers console, create a curves adjustment layer. In the bill of fare, toggle between the different color channels and but drag that line where you want information technology. The college y'all the elevate the signal upward, the more of that color you'll run into. For case, if we're in the cherry-red palette and I elevate information technology upwards, my object will be more than red. If I drag that point downwards, then it'll exist the opposite: green. As with the other methods, you can create a mask on this layer and paint the areas you lot don't desire to be affected.
Pros:
This is great for adding a nice, natural tint and effulgence/darkness to a color quickly.
Cons:
Don't look to make sweeping color changes without severely affecting the quality of your epitome too much.

And there you have it, all my quick and easy ways to adjust colors in Photoshop! While each method volition requite you lot a different issue, don't be afraid to play around and run into what works best for your paradigm. Try combining some of these options every bit well to really refine the colors to get the best lucifer you have envisioned in your mind, and have fun!
Do you have other ways of recoloring your images? Drop your suggestions in the comments below!

How To Recolor Something In Photoshop,
Source: https://www.amyshamblen.com/blog/recolor-objects#:~:text=The%20first%20tried%2Dand%2Dtrue,the%20specific%20color%20you%20want.
Posted by: reesetraturness.blogspot.com
0 Response to "How To Recolor Something In Photoshop"
Post a Comment